

GitHub & Git: for non-technical founders
Version control for vibe coders.
If you've ever nodded along when developers mentioned "pushing to main" or "creating a pull request" — while secretly having no idea what they were talking about — you're not alone.
GitHub sits at the centre of nearly every tech project, but remains a mysterious black box for many non-technical founders. And that knowledge gap is costing you.
In this post:
Watch me do it step-by-step in the video below where i walk through everything
The real-world translation of GitHub jargon that developers assume everyone understands
A step-by-step system for going from complete GitHub novice to confidently managing your tech projects
The exact workflow used by successful non-technical founders to deploy their first websites
Critical mistakes that cause communication breakdowns between founders and developers (and how to avoid them)
A practical reference guide with essential GitHub terms and Git commands explained in plain English
What is GitHub
Let's simplify what GitHub actually is.
Think of GitHub as a super-powered Google Docs for code. That's it.
Google Docs lets multiple people edit documents simultaneously and keeps a history of changes. GitHub does the same thing for code, but with extra safeguards to prevent people from breaking things.
Ever restored an old version of a Google Doc after someone made unwanted changes? GitHub does that for code, but with industrial-strength controls that make it nearly impossible to lose your work.
Why GitHub matters for non-technical founders
As a founder building with AI coding tools, GitHub fundamentals let you:
Store and organize AI-generated code securely
Track changes across multiple AI sessions
Experiment freely without breaking what works
Deploy independently without developer assistance
Version control systems like GitHub are essential tools that help transform AI code suggestions into actual products you can deploy and control.
Understanding Git vs. GitHub
Before diving into repositories and branches, let's understand a key distinction that confuses many founders:
Git is a tool that runs on your computer to track changes to files. It works completely offline.
GitHub is an online service that hosts Git repositories in the cloud so teams can collaborate.
Think of it this way:
Git is like the track changes feature in Microsoft Word
GitHub is like OneDrive where you store and share those documents
This means you can make many changes on your computer before deciding to share them online. This distinction will become important when we talk about the command line later.
Decoding developer speak: GitHub terminology translated

GitHub has its own vocabulary that can sound like a foreign language when you're first exposed to it—I’ve put together a handy glossary below. Let's translate some essential terms into plain English:
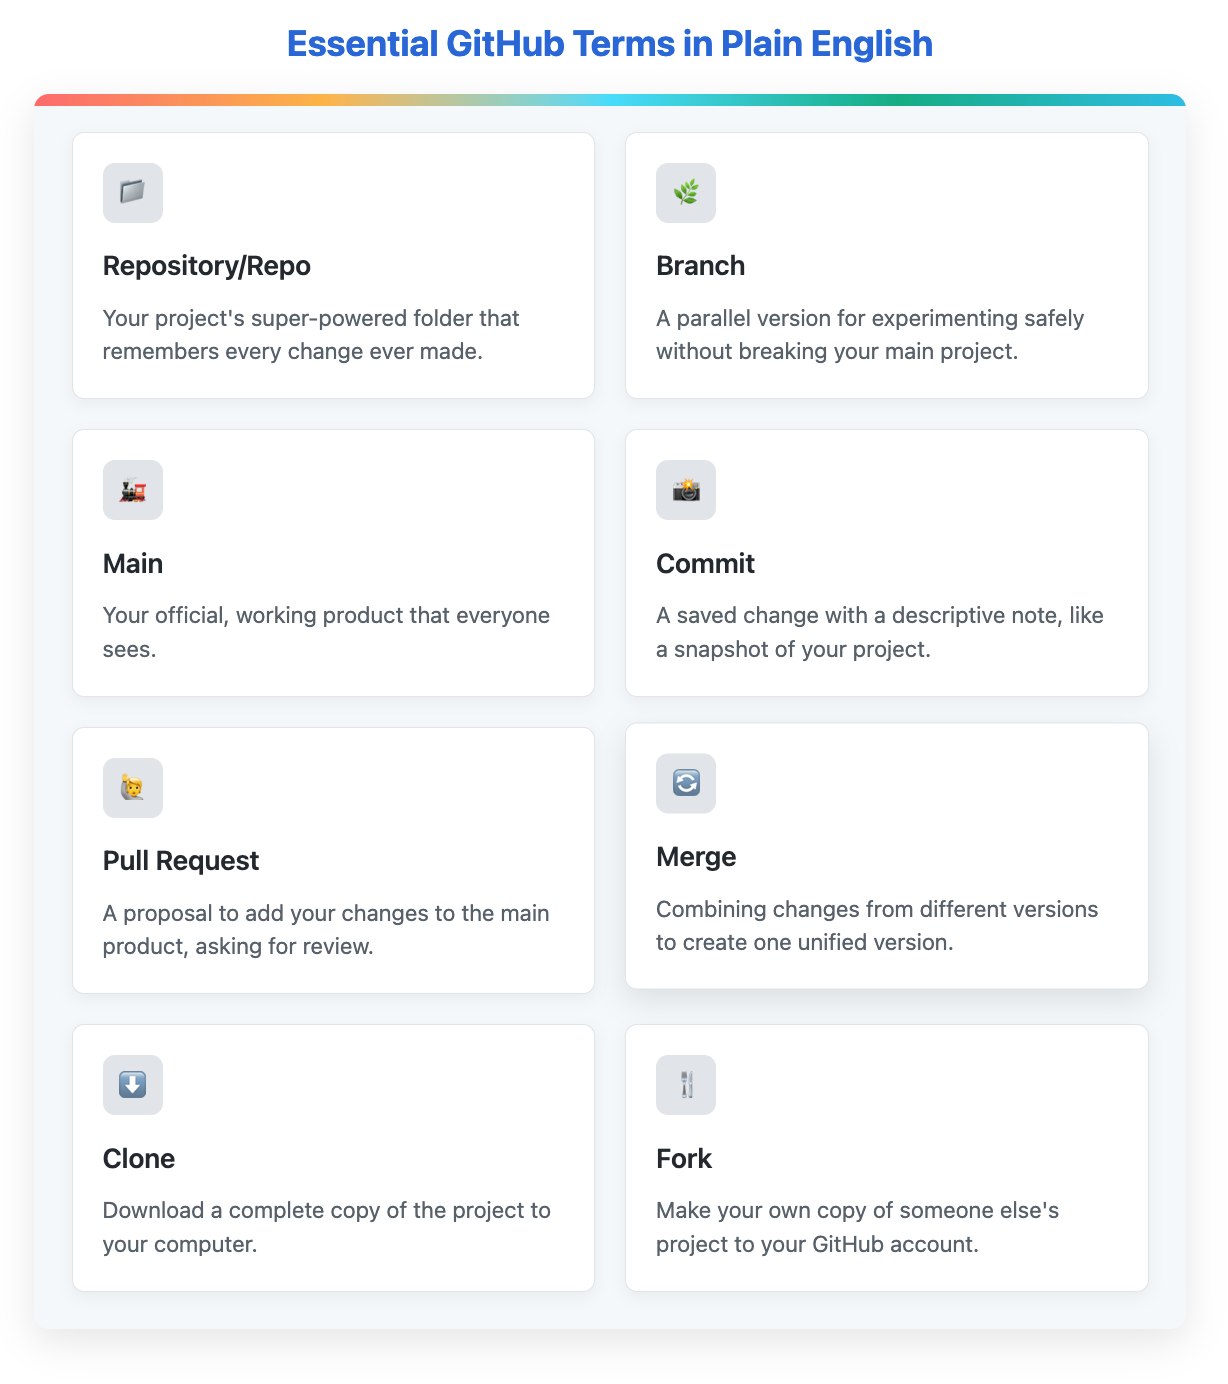
Repository (or "repo") - A super-powered project folder that stores all your code files and remembers every change ever made.
Pushing to main/master - Sending your latest working code changes to the official version that everyone uses.
Creating a branch - Making a separate copy of your project where you can safely experiment with new features without risking the working product.
Merging a pull request - Reviewing and incorporating proposed changes from a separate branch into your main product.
Forking a repository - Creating your own personal copy of someone else's project that you can freely modify.
Cloning a repository - Downloading a complete copy of a GitHub project to your local computer so you can work on it offline.
The challenge isn't that these concepts are complicated—it's that developers use specialised vocabulary. Once you understand the process, the terminology clicks into place.
The GitHub workflow for absolute beginners

Let me walk you through a real-world GitHub workflow, similar to how I build projects with AI coding tools. I'll show you how this works step-by-step with a simple website project.
Don't worry if the command line seems intimidating — the process becomes intuitive with practice, and AI tools can help explain any command you don't understand.
Or, you can use GitHub Desktop (guide below).
Here I’ll walk through the command line (terminal) as i did in the video:
Step 1: Set up your local project
First, create a new folder for your project in your code editor (like Cursor, Replit, or VS Code). I usually keep a dedicated coding folder where I organize all my projects.
Tip: with the terminal, you simply copy/paste the commands shown below and hit enter. Remember to change any placeholder text to match your own e.g. commit messages, folder names, repo name etc.
Command Line Method:
# Initialize git in your project folder
git init

# Check the status to see what files are tracked/untracked
git status
# Initialize git in your project folder
git init
# Check the status to see what files are tracked/untracked
git statusWhen you run git init, it creates a hidden folder that will track all your changes locally. The git status command shows you're on the main branch with no commits yet.
Tip: In most code editors, you can open a terminal window directly in the editor. In Cursor, click on "Terminal" at the top and select "New Terminal."
Step 2: Add your files and make your first commit
After creating your project files (either manually or with AI assistance), you'll want to save these changes to Git.
Command Line Method:
# Initialize git in your project folder
git init
# Check the status to see what files are tracked/untracked
git status
# Add all files to be tracked
git add .

# Commit these changes with a message
git commit -m "First commit"
The git add . command stages all your files for the commit. The period (.) is a shorthand that means "all files" — this is especially handy when working with AI coding tools that might generate multiple files at once.
Your changes are now saved locally, but they're not on GitHub yet.
Step 3: Create a GitHub repository and connect your project
Go to GitHub.com and create a new repository:
Click the "+" icon in the top right and select "New repository"
Name it something descriptive like "github-demo"
Choose public or private
You can add a README, .gitignore, and license if you want
Click "Create repository"
After creating the repository, GitHub will show you commands to connect your local project. Copy the commands that look like:
# Connect to your GitHub repo
git remote add origin https://github.com/[yourusername]/[github-demo].git

# Send to GitHub
git push -u origin main
Run these in your terminal to connect and push your code to GitHub.
Step 4: Deploy your site using GitHub Pages
To make your site live on the internet:
Go to your repository on GitHub
Click on "Settings"
Scroll down to "Pages"
Under "Source," select "Deploy from a branch"
Select the branch (usually "main")
Make sure the folder is set to "/ (root)"
Click "Save"
After about a minute, refresh the page and you'll see a message saying "Your site is live at" with a URL. Click it to see your deployed site!
Step 5: Create a branch for new features
When you want to add a new feature without risking your main code:
Command Line Method:
# Create and switch to a new branch
git checkout -b about-page

# Make your changes to files
# Then commit these changes
git add .
git commit -m "Add about page and link on home page"

# Push this branch to GitHub
git push origin about-page
This creates a separate branch where you can work on your new feature. The main code remains untouched until you're ready to merge.
Step 6: Merge your changes through a pull request
Once your new feature is ready:
Go to your repository on GitHub
You'll see a notification about your recent push to the branch
Click "Compare & pull request"
Add a title and description if needed
Click "Create pull request"
If there are no conflicts, click "Merge pull request" then "Confirm merge"
Or, command line method:
# Switch back to the main branch
git checkout main

# Get latest changes
git pull origin main

# Merge your branch
git merge about-page

# Push the updated main branch to GitHub
git push origin main
Your changes will be merged into the main branch, and GitHub Pages will automatically update your site with the new feature!
Tip: You can see exactly what changed in each file right on GitHub. It shows additions in green and deletions in red, making it easy to review changes before merging.
Tip: The command line might look scary at first, but it's actually faster once you get used to it. Start with the web interface and gradually try command line as you get more comfortable
If you want to use GitHub Desktop instead of the command line:
GitHub workflow using GitHub Desktop
Initial setup
Download and install GitHub Desktop from
https://desktop.github.com/
Sign in to your GitHub account in the app
Creating a new project
Create a new repository:
Click "File" → "New Repository"
Enter a name (e.g., "github-demo")
Choose a local path where files will be stored
Click "Create Repository"
Create your initial files:
Open the repository folder in your code editor
Create your HTML, CSS, or other project files
Save your changes
Make your first commit:
In GitHub Desktop, you'll see all changed files in the left panel
Add a summary (e.g., "First commit") in the bottom left
Click "Commit to main"
Publish to GitHub:
Click "Publish repository" in the top right
Choose whether to keep it private or make it public
Click "Publish repository"
Deploy with GitHub Pages
Understanding Static vs. Dynamic Deployments
When deploying your project from GitHub, you'll encounter two main types of deployments:
Static deployments are perfect for:
Personal websites
Landing pages
Documentation sites
Blogs
Portfolio sites
These sites consist of HTML, CSS, and JavaScript files that work the same for every visitor. They're faster, cheaper, and easier to deploy. GitHub Pages (mentioned above) is a free and easy way to deploy static sites.
Dynamic deployments are needed for:
Apps with user accounts
E-commerce sites
Social networks
Anything with a database
These require a server to process requests and generate custom responses for each user. For these, you'll need services like Vercel, Netlify, Railway, or Heroku, which integrate with GitHub but require more configuration.
Tip: If you're just starting out, stick with static sites until you absolutely need dynamic features. They're simpler to maintain and often free to host.
GitHub Pages: Free website hosting
One of GitHub's best-kept secrets is GitHub Pages — a free service that automatically creates a website from your GitHub files.
For founders building simple marketing sites, landing pages, or portfolios, this eliminates the need for separate hosting services in the early stages.
How to deploy your site with GitHub Pages:
Go to your repository on GitHub
Click on "Settings" in the top navigation bar
Scroll down to the "GitHub Pages" section (or look for "Pages" in the left sidebar)
Under "Source", click the dropdown that says "None"
Select "main" as your branch. Select "/ (root)" as your folder
Click "Save". Wait approximately 30-60 seconds for GitHub to process your request
Refresh the page. You'll see a box with a message saying "Your site is published at https://yourusername.github.io/your-repository-name/"
Click this link to view your live website
That's it! Your project is now live on the internet with a live URL, and it will automatically update whenever you push changes to your main branch.
For custom domains, GitHub Pages even allows you to connect your own domain name through additional DNS configuration in the settings.
The GitHub cheat sheet for non-technical founders
Let's wrap up with a practical reference guide you can use immediately:
Essential GitHub Terms in Plain English
(save this cheatsheet for later)
Essential Git Commands


(save this cheatsheet for later)
GitHub red flags every founder should watch for
Directly editing main: Developers should rarely make changes directly to your main branch
Vague commit messages: "Fixed stuff" tells you nothing about what changed
Giant pull requests: Smaller, focused changes are easier to review and less risky
No README file: This is the instruction manual for your project
Missing documentation: Code without explanation becomes harder to maintain
Your GitHub action plan
If you're ready to take control of your technical projects, here's what to do next:
Create a free GitHub account at github.com
Create your first repository and add a README file
Make a small change to your README and commit it
Create your first branch and make changes there
Create a pull request to merge your changes
In just these five steps, you'll have experienced the core workflow that powers millions of software projects around the world.
Resource Links
GitHub Desktop (visual interface for GitHub): https://desktop.github.com
GitHub Pages Documentation: https://pages.github.com
Vercel (advanced hosting with GitHub integration): https://vercel.com
More detailed GitHub tutorials: https://guides.github.com
One last thing...
Remember that GitHub is a tool, not a skill. The real skill is understanding how your product development workflow functions.
Start small, be curious, and don't be afraid to ask questions. The technical/non-technical divide isn't nearly as wide as it seems from the outside.