

Get started with Bolt: A beginner's guide
A best-practices guide from Ben’s Bites
Think of this guide like a Ben’s Bites snack pack—loaded with tasty tips on how to set up your Bolt projects for success. Whether you’re looking to whip up a quick internal tool or build a production-grade web app, these guidelines will help you make the most of Bolt’s AI-assisted environment. Let’s get cooking!
1. Bolt in a nutshell
Bolt is an AI tool that helps you build full-stack web apps right in your browser.
You chat with an AI agent that uses Claude 3.5 Sonnet in the background.
You shape the code with prompts.
Bolt is (for now) all about web dev.
Limitations: No Python, C#, C++, or other non-web languages. You’ll be happiest with JavaScript/TypeScript, React, Next.js, etc.
2. Understand token limits
Tokens are the currency of AI. With Bolt, each subscription plan comes with access to a certain number of tokens.
Tokens are: The individual units (words, subwords, or characters) that the model processes.
Tokens are consumed by:
Chat messages (your prompts + AI responses).
AI-generated code.
AI reading existing code to keep context.
Why it matters:
Monthly subscription tokens do not roll over.
Paid token reloads do rollover as long as you stay on a paid plan.
3. Provide clear objectives & basic specs
Give Bolt a concise, high-level pitch plus 2–3 core features in your first prompt—enough context so the AI knows what you want, but not so much that you confuse or over-constrain it.
Why it matters
Too vague → Bolt might produce a random or incomplete layout.
Too detailed (or contradictory) → Bolt can get “overfitted” and tangled in conflicting instructions.
Example of an initial prompt:
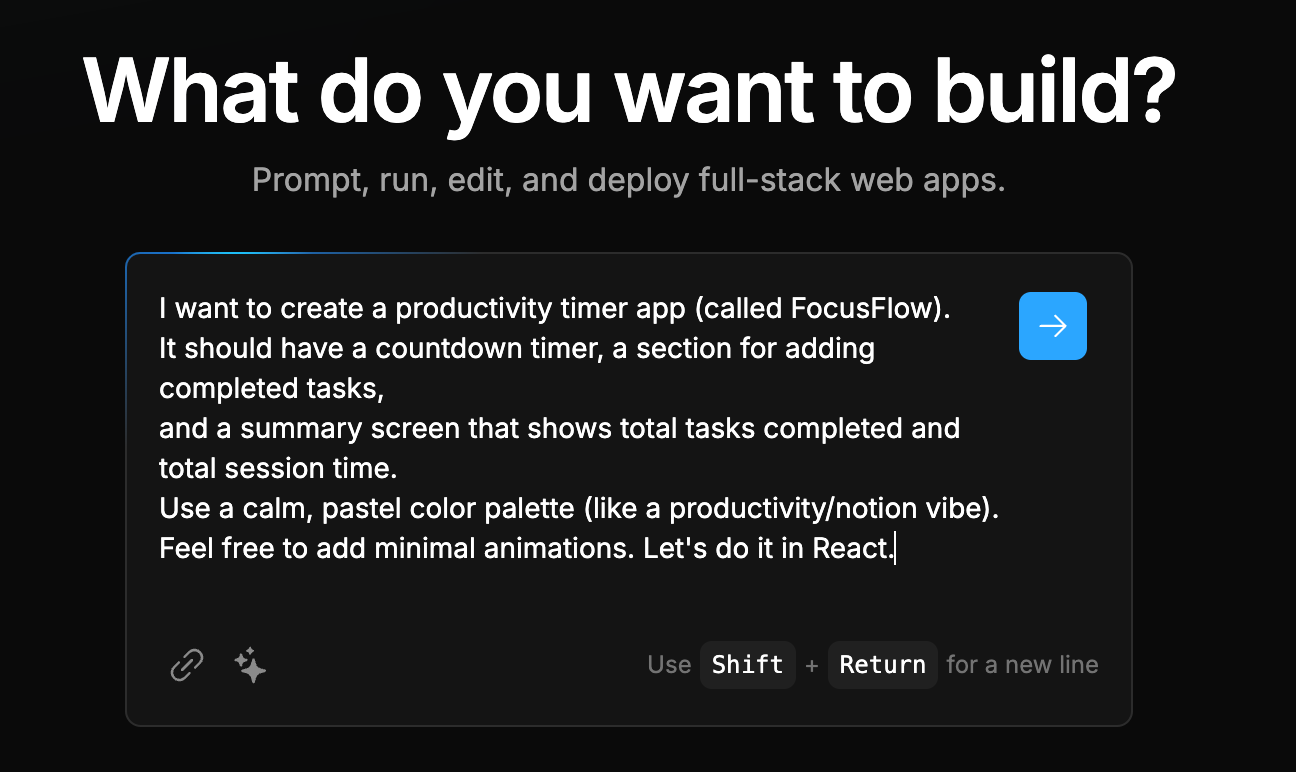
This prompt tells Bolt:
The theme (productivity timer app)
Key features (countdown timer, tasks, session summary)
Styling (calm, pastel, minimal animations)
Tech stack (React)
💡 Pro Tip: Use the Enhance Prompt button.
Why use it:
Bolt’s Enhance Prompt button automatically reformats or expands your text for better AI interpretation. It tries to make your instructions clearer and more structured so the AI’s code generation is more accurate.
Watch out:
Occasionally, “Enhance Prompt” may remove or alter small details from your original text—especially if you listed very specific requirements (e.g., “strict brand color #123ABC,” “use only X library”). Always double-check the revised prompt to ensure nothing important was dropped.
Prompt after selecting the ‘Enhance Prompt’ ✨ button
Create a React application called FocusFlow - a minimalist productivity timer with the following specifications:
Core Features:
Implement a customizable countdown timer (25/5/15 minute presets)
Create a task management section where users can:
Add completed tasks with timestamps
Mark tasks as complete/incomplete
Delete tasks
Add brief task descriptions (max 100 characters)
Design a summary dashboard displaying:
Total focused time today
Tasks completed today
Weekly productivity overview
Current streak of daily sessions
Design Requirements:Use this specific color palette:
Primary: #F8F9FA (background)
Secondary: #E9ECEF (cards/containers)
Accent: #4C6EF5 (buttons/interactive elements)
Text: #495057 (primary text)
Muted: #ADB5BD (secondary text)
Implement subtle micro-interactions:
Gentle pulse animation for active timer
Smooth transitions between timer states
Fade-in/out for task completion
Subtle hover effects on interactive elements
Technical Specifications:Use React with functional components and hooks
Implement local storage for persistence
Ensure mobile-responsive design
Include sound notifications for timer completion
Add keyboard shortcuts for common actions
Please provide the implementation with clean, documented code and proper component organization.
4. Incremental feature requests
Add or remove a single feature in each follow-up prompt.
Why it matters: Piling on too many features in one prompt can cause errors to compound. If something breaks, you won’t know which request caused it.
💡 Pro Tip: UI changes are often straightforward to combine in one prompt (e.g., color changes, layout tweaks). Functionality changes can stack errors if tackled all at once. Split functionality-based features into their own prompts.
5. Make smart use of visual references
Show, don’t just tell.
Why it matters: Screenshots or thorough style descriptions can guide Bolt to replicate specific layouts, color palettes, or “vibes.”
Example:
Attach a competitor’s screenshot: “Use these soft pastel gradients like the Arc Browser.”
Describe the vibe: “Make it calm and soothing, not neon and harsh.”
💡 Pro Tip: Use a tool like Excalidraw, Mermaid, Miro or even Freeform to draw visuals of your site scaffolding, the user journey, or flow charts to help AI understand the architecture of your website.
6. Get specific with your prompts
Direct the AI to certain files or functions.
Why it matters: This can help with token usage and keep the AI from inadvertently messing up stable code.
Example: Right-click a file and choose “Target file” to let Bolt know exactly where to make changes.
💡 Pro Tip: If you right-click a file in the Bolt code editor and select “Lock file, Bolt won’t make changes to those locked files.
7. Have a testing mindset
AI isn’t perfect; expect small mistakes.
Resist the urge to spam the “Fix Error” button. Each click consumes tokens. If the AI keeps failing, refine your prompt try the following:
Provide the exact error message you are trying to fix
Share screenshots of the errors
Check Bolt’s forum.
Google the error.
Ask ChatGPT or Claude in a separate session.
Ask the Ben’s Bite community!
Don’t forget to combine some of these (e.g. provide an exact error message, share a screenshot, and a helpful comment from StackOverflow).
💡 Pro Tip: Insert robust logging or error handling to help the AI (and yourself) see where things break.
8. Use Expo with Bolt for mobile apps
Want to ship iOS/Android apps without diving into native code? Expo is your ticket.
What it is: A framework + toolkit that lets you build and run React Native apps on iOS, Android, and web—no native setup required.
How it works with Bolt: Simply ask Bolt to “Create a React Native app with Expo.” You’ll get a codebase that’s instantly testable in the free Expo Go app on any phone.
Why it matters:
Cross-Platform: One codebase for Android, iOS, and web.
Quick Iterations: Real-time previews via Expo Go—no waiting on app store builds.
Production-Ready: Generate final binaries (APK/IPA) or do over-the-air updates through Expo Application Services (EAS).
💡 Pro Tip: Add or remove features incrementally (e.g., “Add camera support,” “Integrate push notifications”). Smaller prompts keep Bolt’s AI on track.
9. Use Figma to go from prototype to app faster
Bolt’s Figma integration (powered by Anima) converts any Figma design frame into a working full-stack application in Bolt.
How to use Figma files in Bolt:
On the Bolt.new homepage, click “Import from Figma.”
Copy the Figma frame URL (right-click your frame in Figma and choose “Copy link to selection”), then paste it into Bolt and click “Import Figma frame into Bolt.”
⚠️ Advanced topics ahead!
Starting from here, you’ll see more in-depth or advanced features. If you’re new to web dev, you can skim this section now and revisit it later once you’re comfortable. Don’t worry if you see unfamiliar terms like backends, environment variables, or OAuth. You can always come back when you need them!
Use a preferred backend. Don’t leave it up to chance—tell it what you want. (Firebase, Supabase, etc.).
Tackle authentication last (if you’re a beginner). Auth can be complex—save it for dessert.
System prompt per project (and globally!) You can now customise a “system prompt” to shape Bolt’s overall behaviour. If you have favourite libraries or coding standards, set them up so Bolt automatically follows your preferences.
Managing environment variables
Keep secrets secret. Bolt may move config into a .env file—best practice to avoid pushing secrets to public repos.
💡 Pro Tips:
1. Production: Use a secure environment variable manager based on where you deploy (e.g., Netlify, Vercel).
2. Dev: Hardcode if you must, then remove secrets before going live.
Open the Bolt preview in its own browser tab/window. It might be broken because: iframes. This is crucial for Stripe, OAuth (Google, Facebook), or YouTube embeds, which often block iframes.
Dark mode: Just ask for a toggle! Everyone loves a good Dark Mode. If you want to preserve your brand colors, mention them so Bolt doesn’t create “blinding” contrasts. Say “Add a toggle for Dark Mode,” or attach a screenshot showing your preferred style.
The “Bolt App Checklist”
Don’t skip these finishing touches:
[ ] Favicon
[ ] Redirects
[ ] Social Preview Image
[ ] Custom 404 Page
[ ] Meta Descriptions & Title Tags
[ ] Alt Text for Images
[ ] ARIA Labels for Accessibility
[ ] Privacy Policy & Terms of Service
[ ] Search Console Setup
These details might feel small, but they make your app polished, accessible, and user-friendly.
In summary
Bolt is a powerful companion for building full-stack web apps right inside your browser. By feeding it clear, incremental prompts—and fueling it with screenshots, references, and error logs—you’ll guide it to create exactly what you need. Keep an eye on token usage, manage your environment variables, and always test new features step by step.
Now grab your dev tools and get building—the next amazing web app could be just a few prompts away! Bon appétit from Ben’s Bites!
This post was created by Amie.